Một tile map là map game hay quang cảnh làm nền để nhân vật đi lên trên. Tile map có trong game như Diablo, Fallout, Command and Conquer, StarCraft, Final Fantasy, Pokemon, và hầu hết các game RPG/MMORPG và game chiến thuật 2D. Sau đây là ví dụ trong sử dụng Tile map:
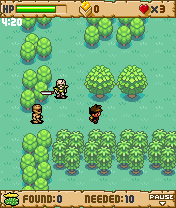
Screenshot of the game Herbarrio
Gọi là tile map bởi nó được tạo nên từ nhiều ảnh nhỏ gọi là tile. Tile được vẽ nối nhau rất phù hợp và tạo nên map cho game. Một bộ tile cùng chủ đề gọi là tileset.
Lí do phải dùng tile map là để game không phải load ảnh map lớn mà chỉ phải load một tileset nhỏ và dùng lại nó để vẽ map. Ta có thể dùng cùng một tileset tạo nhiều map khác nhau. Việc này giúp chúng ta tiết kiệm bộ nhớ và làm game load nhanh hơn.
Trong bài học hôm nay, chúng ta sẽ sử dụng lại code của bài trước: Sử dụng lớp Sprite và di chuyển Sprite trong MIDP 2.0. Giờ ta sẽ làm một map cho chiếc xe tải chạy và chướng ngại vật chắn đường xe bằng lớp TiledLayer của MIDP 2.0, được tạo ra đặc biệt để vẽ map.
Map chúng ta làm sẽ có kích thước 176x208 (độ phân giải của hầu hết máy Nokia dòng s60v2 như N70, N72...). Thôi không dài dòng nữa, đây là ví dụ giải thích cho các bạn dễ hiểu (hay càng khó hiểu hơn nhỉ, hahaha)
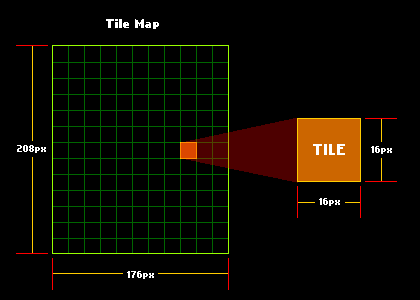
Giải thích về Tile Map

Tileset Image
Dimensions: 160x16 pixels
Tile Size: 16x16 pixels
Tileset Image zoomed in at 2x
biến imgTileset dùng để lưu trữ ảnh tileset bạn vừa down. Biến roadMap kiểu TiledLayer dùng vẽ đường, nơi xe có thể chạy. Biến blockMap kiểu TiledLayer dùng hiển thị các chướng ngại vật, cũng dùng để phát hiện va chạm.
Tiếp theo, chúng ta thêm phương thức loadRoadMap( ) khởi tạo cho biến roadMap. Thêm đoạn code sau dưới phương thức start( )
Phương thức loadRoadMap( ) tạo đối tượng TiledLayer và xác định số hàng, cột, ảnh tileset sẽ dùng, kích thước tile. Sau đó nó gán các chỉ số tile ngẫu nhiên từ 2 đến 5 đến mỗi ô của map bằng phương thức setCell( )
Chú ý rằng chỉ số tile bắt đầu từ 1 chứ không phải 0. Bạn có thể để tile đầu trong suốt, để nó không hiển thị được.
Làm tương tự với blockMap và thêm phương thức loadBlockMap( ). Thêm đoạn code sau vào dưới phương thức loadRoadMap( )
Phương thức này cũng như loadRoadMap( ) ngoại trừ việc chỉ số mỗi ô dựa vào mảng đã cho trước.
Bây giờ chúng ta chỉnh sửa phương thức load( ) để load ảnh tileset và gọi phương thức chúng ta đã thêm để khởi tạo đối tượng TiledLayer. Ta thay đổi cả nơi bắt đầu hiển thị xe để tránh việc nó kẹt vào chướng ngại vật.
Ta chỉnh sửa cả phương thức unload( ) như sau
Giờ chúng ta vẽ map lên màn hình. Thêm mấy dòng sau vào phương thức run( ) trước khi xe được vẽ:
Kiểm tra va chạm
Nếu bây giờ bạn chạy project thì sẽ thấy xe vẫn đi được lên trên các chướng ngại vật. Rất may là hai class TiledLayer và Sprite có phương thức kiểm tra va chạm.
Đầu tiên ta thay đổi tốc độ chiếc xe. Khai báo biến toàn cục vanSpeed như sau
Sau đó, thay đổi phương thức run( ) sử dụng biến vanSpeed
Đoạn code sau đây kiểm tra va chạm nếu xe chạm vào chướng ngại vật và vẽ lại xe về chỗ cũ trước khi nó đâm vào chướng ngại vật. Thêm đoạn code sau vào sau đoạn code update vị trí xe.
Phương thức Sprite.collodesWith( ) dùng để phát hiện va chạm giữa xe với các đối tượng blockMap. Tham số thứ 2, giá trị "true" chỉ ra rằng nó phải kiểm tra va chạm ở "mức độ pixel". Tức là chỉ kiểm tra va chạm nếu phần pixel có màu của xe tải chạm vào phần pixel có màu của chướng ngại vật. Bạn cũng có thể dùng phương thức collidesWith( ) để kiểm tra va chạm giữa các đối tượng Sprite.
Nhận tiện, vì map chiếm hết cả màn hình, ta không cần đoạn code fill màn hình màu đen nữa. Hãy xóa hoặc chú thích nó đi.
Khi chạy project bạn sẽ thấy như sau:
Về Tilemap, các bạn có thể tìm trên internet với từ khóa "tile map" để tham khảo. Chúc các bạn thành công !!
Screenshot of the game Herbarrio
Gọi là tile map bởi nó được tạo nên từ nhiều ảnh nhỏ gọi là tile. Tile được vẽ nối nhau rất phù hợp và tạo nên map cho game. Một bộ tile cùng chủ đề gọi là tileset.
Lí do phải dùng tile map là để game không phải load ảnh map lớn mà chỉ phải load một tileset nhỏ và dùng lại nó để vẽ map. Ta có thể dùng cùng một tileset tạo nhiều map khác nhau. Việc này giúp chúng ta tiết kiệm bộ nhớ và làm game load nhanh hơn.
Trong bài học hôm nay, chúng ta sẽ sử dụng lại code của bài trước: Sử dụng lớp Sprite và di chuyển Sprite trong MIDP 2.0. Giờ ta sẽ làm một map cho chiếc xe tải chạy và chướng ngại vật chắn đường xe bằng lớp TiledLayer của MIDP 2.0, được tạo ra đặc biệt để vẽ map.
Map chúng ta làm sẽ có kích thước 176x208 (độ phân giải của hầu hết máy Nokia dòng s60v2 như N70, N72...). Thôi không dài dòng nữa, đây là ví dụ giải thích cho các bạn dễ hiểu (hay càng khó hiểu hơn nhỉ, hahaha)
Giải thích về Tile Map
Khung chữ nhật xanh là tile map, những ô trong nó là các tile vẽ nên map. Kích thước tile map dựa vào số hàng và cột của các tile trong đó. Như ví dụ trên thì map này có kích thước 11x13 tile và mỗi tile có kích thước 16x16 pixel. Rất vừa vặn cho màn hình 176x208.
Tạo và hiển thị TiledLayer
Devlin đã chuẩn bị sẵn cho chúng ta một tileset dưới đây. Bạn có thể down về dùng hoặc có thể tự vẽ nếu vẽ đẹp (share cho tôi dùng với ^^).
Tileset Image
Dimensions: 160x16 pixels
Tile Size: 16x16 pixels
Đây là hình đã phóng to gấp đôi
Tileset Image zoomed in at 2x
Làm việc nào. Mở clsCanvas, thêm biến cho đối tượng TiledLayer và ảnh tileset
private Image imgTileset;
private TiledLayer roadMap;
private TiledLayer blockMap;
    /** Creates a new instance of clsCanvas */
    public clsCanvas(midMain m) {
biến imgTileset dùng để lưu trữ ảnh tileset bạn vừa down. Biến roadMap kiểu TiledLayer dùng vẽ đường, nơi xe có thể chạy. Biến blockMap kiểu TiledLayer dùng hiển thị các chướng ngại vật, cũng dùng để phát hiện va chạm.
Tiếp theo, chúng ta thêm phương thức loadRoadMap( ) khởi tạo cho biến roadMap. Thêm đoạn code sau dưới phương thức start( )
    public void loadRoadMap(){
        //initialize the roadMap
        roadMap = new TiledLayer(11, 13, imgTileset, 16, 16);

        // Create a new Random for randomizing numbers
        Random Rand = new Random();

        //loop through all the map cells
        for (int y = 0; y < 13; y++){
            for (int x = 0; x < 11; x++){
                // get a random tile index between 2 and 5
                int index = (Math.abs(Rand.nextInt()>>>1) % (3)) + 2;

                // set the tile index for the current cell
                roadMap.setCell(x, y, index);
            }
        }
        // mark Rand for clean up
        Rand = null;
    }
Phương thức loadRoadMap( ) tạo đối tượng TiledLayer và xác định số hàng, cột, ảnh tileset sẽ dùng, kích thước tile. Sau đó nó gán các chỉ số tile ngẫu nhiên từ 2 đến 5 đến mỗi ô của map bằng phương thức setCell( )
Chú ý rằng chỉ số tile bắt đầu từ 1 chứ không phải 0. Bạn có thể để tile đầu trong suốt, để nó không hiển thị được.
Làm tương tự với blockMap và thêm phương thức loadBlockMap( ). Thêm đoạn code sau vào dưới phương thức loadRoadMap( )
    public void loadBlockMap(){
        // define the tile indexes to be used for each map cell
        byte[][] blockData = {
            {10, 8 , 7 , 6 , 10, 9 , 8 , 7 , 6 , 10, 9 },
            {6 , 0 , 0 , 0 , 0 , 0 , 0 , 0 , 0 , 0 , 8 },
            {7 , 0 , 0 , 0 , 0 , 0 , 0 , 0 , 0 , 0 , 7 },
            {8 , 0 , 0 , 10, 6 , 0 , 0 , 7 , 0 , 0 , 6 },
            {9 , 0 , 0 , 0 , 0 , 0 , 0 , 8 , 0 , 0 , 10},
            {10, 0 , 0 , 0 , 0 , 0 , 0 , 9 , 0 , 0 , 9 },
            {6 , 0 , 0 , 8 , 0 , 0 , 0 , 0 , 0 , 0 , 8 },
            {7 , 0 , 0 , 7 , 0 , 0 , 0 , 0 , 0 , 0 , 7 },
            {8 , 0 , 0 , 6 , 0 , 0 , 0 , 10, 0 , 0 , 6 },
            {9 , 0 , 0 , 10, 0 , 0 , 7 , 6 , 0 , 0 , 10},
            {10, 0 , 0 , 0 , 0 , 0 , 0 , 0 , 0 , 0 , 9 },
            {6 , 0 , 0 , 0 , 0 , 0 , 0 , 0 , 0 , 0 , 8 },
            {7 , 8 , 9 , 10, 6 , 7 , 8 , 9 , 10, 6 , 7 }
        };

        //initialize blockMap
        blockMap = new TiledLayer(11, 13, imgTileset, 16, 16);

        //loop through all the map cells
        for (int y = 0; y < 13; y++){
            for (int x = 0; x < 11; x++){
                // set the tile index for the current cell
                // take note of the reversed indexes for blockData
                blockMap.setCell(x, y, blockData[y][x]);
            }
        }

        blockData = null;
    }
Phương thức này cũng như loadRoadMap( ) ngoại trừ việc chỉ số mỗi ô dựa vào mảng đã cho trước.
Bây giờ chúng ta chỉnh sửa phương thức load( ) để load ảnh tileset và gọi phương thức chúng ta đã thêm để khởi tạo đối tượng TiledLayer. Ta thay đổi cả nơi bắt đầu hiển thị xe để tránh việc nó kẹt vào chướng ngại vật.
    public void load(){
        try{
            // load the images here
            imgVan = Image.createImage("/images/van.png");

            // load the tileset
            imgTileset = Image.createImage("/images/tileset1.png");
        }catch(Exception ex){
            // exit the app if it fails to load the image
            isRunning = false;
            return;
        }

        // initialize the Sprite object
        Van = new Sprite(imgVan, 18, 18);

        // show the frame 1 - the second frame
        Van.setFrame(1);

        // move to 16, 16 (X, Y)
        Van.setPosition(16, 16);

        //initialize the TiledLayers
        loadRoadMap();
        loadBlockMap();
    }
Ta chỉnh sửa cả phương thức unload( ) như sau
    public void unload(){
        // make sure the object gets destroyed
        blockMap = null;
        roadMap = null;
        Van = null;
        imgTileset = null;
        imgVan = null;
    }
Giờ chúng ta vẽ map lên màn hình. Thêm mấy dòng sau vào phương thức run( ) trước khi xe được vẽ:
           //draw the road
           roadMap.paint(g);

           //draw the blocks
           blockMap.paint(g);
           // draw the sprite
           Van.paint(g);

           flushGraphics();
Kiểm tra va chạm
Nếu bây giờ bạn chạy project thì sẽ thấy xe vẫn đi được lên trên các chướng ngại vật. Rất may là hai class TiledLayer và Sprite có phương thức kiểm tra va chạm.
Đầu tiên ta thay đổi tốc độ chiếc xe. Khai báo biến toàn cục vanSpeed như sau
private Sprite Van;

private int vanSpeed = 2;
private Image imgTileset;
Sau đó, thay đổi phương thức run( ) sử dụng biến vanSpeed
           if ((iKey & GameCanvas.UP_PRESSED) != 0){
               // show the van facing up
               Van.setFrame(0);

               // move the van upwards
               cy -= vanSpeed;
           } else if ((iKey & GameCanvas.DOWN_PRESSED) != 0){
               // show the van facing down
               Van.setFrame(1);

               // move the van downwards
               cy += vanSpeed;
           } else if ((iKey & GameCanvas.LEFT_PRESSED) != 0){
               // show the van facing left
               Van.setFrame(2);

               // move the van to the left
               cx -= vanSpeed;
           } else if ((iKey & GameCanvas.RIGHT_PRESSED) != 0){
               // show the van facing right
               Van.setFrame(3);

               // move the van to the right
               cx += vanSpeed;
           }
Bây giờ đến phần kiểm tra va chạm. Chúng ta lưu vị trí hiện thời của xe vào hai biến tx và ty, để có thể vẽ lại vị trí chiếc xe về nơi trước khi nó chạm chướng ngại vật.
           // get the current position of the van
           int cx = Van.getX();
           int cy = Van.getY();

           // save the current position in temporary vars
           // so we can restore it when it hits a block
           int tx = cx;
           int ty = cy;
           if ((iKey & GameCanvas.UP_PRESSED) != 0){
Đoạn code sau đây kiểm tra va chạm nếu xe chạm vào chướng ngại vật và vẽ lại xe về chỗ cũ trước khi nó đâm vào chướng ngại vật. Thêm đoạn code sau vào sau đoạn code update vị trí xe.
           // update the vans position
           Van.setPosition(cx, cy);

           //check if the van hits a block
           if (Van.collidesWith(blockMap, true)){
             //reset the van to the original position
             Van.setPosition(tx, ty);
           }
           //restore the clipping rectangle to full screen
           g.setClip(0, 0, screenW, screenH);
Phương thức Sprite.collodesWith( ) dùng để phát hiện va chạm giữa xe với các đối tượng blockMap. Tham số thứ 2, giá trị "true" chỉ ra rằng nó phải kiểm tra va chạm ở "mức độ pixel". Tức là chỉ kiểm tra va chạm nếu phần pixel có màu của xe tải chạm vào phần pixel có màu của chướng ngại vật. Bạn cũng có thể dùng phương thức collidesWith( ) để kiểm tra va chạm giữa các đối tượng Sprite.
Nhận tiện, vì map chiếm hết cả màn hình, ta không cần đoạn code fill màn hình màu đen nữa. Hãy xóa hoặc chú thích nó đi.
           //restore the clipping rectangle to full screen
           g.setClip(0, 0, screenW, screenH);

           /* comment out or remove this code

           set drawing color to black
           g.setColor(0x000000);

           fill the screen with blackness
           g.fillRect(0, 0, screenW, screenH);

            */
           //draw the road
           roadMap.paint(g);
Khi chạy project bạn sẽ thấy như sau:
Và sau đây là code lớp clsCanvas hoàn chỉnh cho các bạn đối chiếu và tham khảo:
package MyGame;

import java.util.Random;
import javax.microedition.lcdui.Graphics;
import javax.microedition.lcdui.Image;
import javax.microedition.lcdui.game.GameCanvas;
import javax.microedition.lcdui.game.Sprite;
import javax.microedition.lcdui.game.TiledLayer;

public class clsCanvas extends GameCanvas implements Runnable {

// key repeat rate in milliseconds
public static final int keyDelay = 250;

//key constants
public static final int upKey = 0;
public static final int leftKey = 1;
public static final int downKey = 2;
public static final int rightKey = 3;
public static final int fireKey = 4;

//key states for up, left, down, right, and fire key
private boolean[] isDown = {
    false, false, false, false, false
};

//last time the key changed state
private long[] keyTick = {
    0, 0, 0, 0, 0
};

//lookup table for key constants :P
private int[] keyValue = {
    GameCanvas.UP_PRESSED, GameCanvas.LEFT_PRESSED,
    GameCanvas.DOWN_PRESSED, GameCanvas.RIGHT_PRESSED,
    GameCanvas.FIRE_PRESSED
};

private boolean isRunning = true;
private Graphics g;
private midMain fParent;

private Image imgVan;
private Sprite Van;

private int vanSpeed = 2;

private Image imgTileset;
private TiledLayer roadMap;
private TiledLayer blockMap;
    public clsCanvas(midMain m) {
        super(true);
        fParent = m;
        setFullScreenMode(true);
    }

    public void start(){
        Thread runner = new Thread(this);
        runner.start();
    }

    public void loadRoadMap(){
        //initialize the roadMap
        roadMap = new TiledLayer(11, 13, imgTileset, 16, 16);

        // Create a new Random for randomizing numbers
        Random Rand = new Random();

        //loop through all the map cells
        for (int y = 0; y < 13; y++){
            for (int x = 0; x < 11; x++){
                // get a random tile index between 2 and 5
                int index = (Math.abs(Rand.nextInt()>>>1) % (3)) + 2;

                // set the tile index for the current cell
                roadMap.setCell(x, y, index);
            }
        }

        Rand = null;
    }

    public void loadBlockMap(){
        // define the tile indexes to be used for each map cell
        byte[][] blockData = {
            {10, 8 , 7 , 6 , 10, 9 , 8 , 7 , 6 , 10, 9 },
            {6 , 0 , 0 , 0 , 0 , 0 , 0 , 0 , 0 , 0 , 8 },
            {7 , 0 , 0 , 0 , 0 , 0 , 0 , 0 , 0 , 0 , 7 },
            {8 , 0 , 0 , 10, 6 , 0 , 0 , 7 , 0 , 0 , 6 },
            {9 , 0 , 0 , 0 , 0 , 0 , 0 , 8 , 0 , 0 , 10},
            {10, 0 , 0 , 0 , 0 , 0 , 0 , 9 , 0 , 0 , 9 },
            {6 , 0 , 0 , 8 , 0 , 0 , 0 , 0 , 0 , 0 , 8 },
            {7 , 0 , 0 , 7 , 0 , 0 , 0 , 0 , 0 , 0 , 7 },
            {8 , 0 , 0 , 6 , 0 , 0 , 0 , 10, 0 , 0 , 6 },
            {9 , 0 , 0 , 10, 0 , 0 , 7 , 6 , 0 , 0 , 10},
            {10, 0 , 0 , 0 , 0 , 0 , 0 , 0 , 0 , 0 , 9 },
            {6 , 0 , 0 , 0 , 0 , 0 , 0 , 0 , 0 , 0 , 8 },
            {7 , 8 , 9 , 10, 6 , 7 , 8 , 9 , 10, 6 , 7 }
        };

        //initialize blockMap
        blockMap = new TiledLayer(11, 13, imgTileset, 16, 16);

        //loop through all the map cells
        for (int y = 0; y < 13; y++){
            for (int x = 0; x < 11; x++){
                // set the tile index for the current cell
                // take note of the reversed indexes for blockData
                blockMap.setCell(x, y, blockData[y][x]);
            }
        }

        blockData = null;
    }
    public void load(){
        try{
            // load the images here
            imgVan = Image.createImage("/images/van.png");

            imgTileset = Image.createImage("/images/tileset1.png");
        }catch(Exception ex){
            // exit the app if it fails to load the image
            isRunning = false;
            return;
        }

        // initialize the Sprite object
        Van = new Sprite(imgVan, 18, 18);

        // show the frame 1 - the second frame
        Van.setFrame(1);

        // move to 16, 16 (X, Y)
        Van.setPosition(16, 16);

        loadRoadMap();
        loadBlockMap();
    }

    public void unload(){
        // make sure the object gets destroyed
        blockMap = null;
        roadMap = null;
        Van = null;
        imgTileset = null;
        imgVan = null;
    }

    public void checkKeys(int iKey, long currTick){
        long elapsedTick = 0;
        //loop through the keys
        for (int i = 0; i < 5; i++){
            // by default, key not pressed by user
            isDown[i] = false;
            // is user pressing the key
            if ((iKey & keyValue[i]) != 0){
                elapsedTick = currTick - keyTick[i];
                //is it time to toggle key state?
                if (elapsedTick >= keyDelay){
                    // save the current time
                    keyTick[i] = currTick;
                    // toggle the state to down or pressed
                    isDown[i] = true;
                }
            }
        }
    }

    public void run() {
       int iKey = 0;
       int screenW = getWidth();
       int screenH = getHeight();
       long lCurrTick = 0; // current system time in milliseconds;

       load();
       g = getGraphics();
       while(isRunning){

           lCurrTick = System.currentTimeMillis();
           iKey = getKeyStates();

           checkKeys(iKey, lCurrTick);

           if (isDown[fireKey]){
               isRunning = false;
           }

           // get the current position of the van
           int cx = Van.getX();
           int cy = Van.getY();

           // save the current position in temporary vars
           // so we can restore it when we hit a block
           int tx = cx;
           int ty = cy;
           if ((iKey & GameCanvas.UP_PRESSED) != 0){
               // show the van facing up
               Van.setFrame(0);

               // move the van upwards
               cy -= vanSpeed;
           } else if ((iKey & GameCanvas.DOWN_PRESSED) != 0){
               // show the van facing down
               Van.setFrame(1);

               // move the van downwards
               cy += vanSpeed;
           } else if ((iKey & GameCanvas.LEFT_PRESSED) != 0){
               // show the van facing left
               Van.setFrame(2);

               // move the van to the left
               cx -= vanSpeed;
           } else if ((iKey & GameCanvas.RIGHT_PRESSED) != 0){
               // show the van facing right
               Van.setFrame(3);

               // move the van to the right
               cx += vanSpeed;
           }

           // update the vans position
           Van.setPosition(cx, cy);

           //check if the van hits a block
           if (Van.collidesWith(blockMap, true)){
             //reset the van to the original position
             Van.setPosition(tx, ty);
           }
           //restore the clipping rectangle to full screen
           g.setClip(0, 0, screenW, screenH);

           /* comment out or remove this code

           set drawing color to black
           g.setColor(0x000000);

           fill the screen with blackness
           g.fillRect(0, 0, screenW, screenH);

            */

           //draw the road
           roadMap.paint(g);

           //draw the blocks
           blockMap.paint(g);
           // draw the sprite
           Van.paint(g);

           flushGraphics();

           try{
               Thread.sleep(30);
           } catch (Exception ex){

           }
       }
       g = null;
       unload();
       fParent.destroyApp(false);
       fParent = null;
    }
}
Về Tilemap, các bạn có thể tìm trên internet với từ khóa "tile map" để tham khảo. Chúc các bạn thành công !!
I feel really happy to have seen your webpage and look forward to so many more entertaining times reading here. Thanks once more for all the details. fallout 4 teleport console command
Trả lờiXóa